
Walk-in closet lighting is specified last and noticed first. A wardrobe can be built to the millimetre and still fail if the light is wrong: one ceiling fixture throws every hanging bay into shadow, and the drawer you actually open each morning ends up the darkest box in the room. We build closet lighting into wardrobe runs in three layers, and this is where each one goes and why.
The short version
Three layers, all decided at drawing stage:
- The cove wash - a recessed channel at the top of the run bounces light off the ceiling, so the room reads as lit without a visible fixture in it.
- Integrated strips in the uprights - LED inside the upright profile, so what you see is the glow down the panel, not the diodes.
- Task light inside the fitting - strips flanking the shoe tower, the jewellery drawer and the care station, where the hands actually work.
None of the three is a bought-in accessory bolted on after the fact: the channels are milled with the carcass and the cable routes are set out on the drawing, so the light is designed in rather than stuck on. Closet lighting is a drawing note, not a shopping list - which is the only way it ends up looking like it was always there.
Layer one: the cove wash
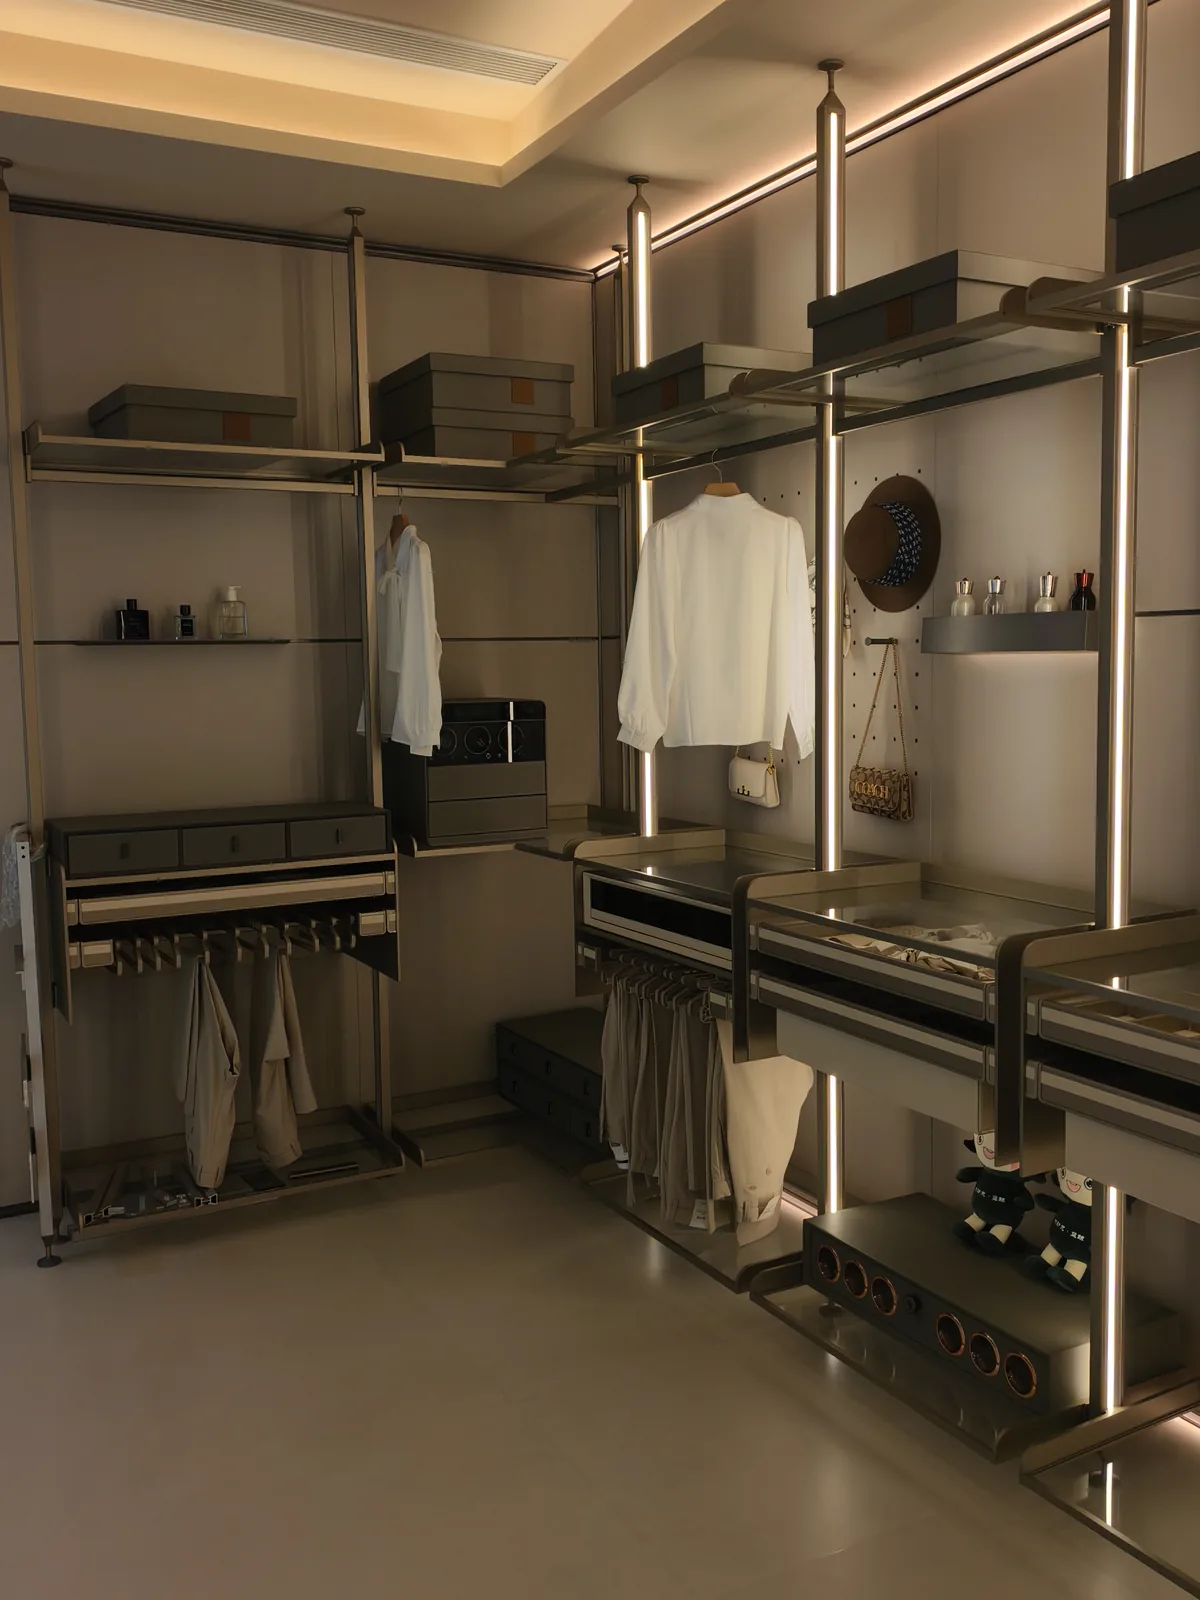
The cove is the ambient layer, and it is the one buyers skip and then miss. A light source hidden behind a valance at the top of the wardrobe washes the ceiling and the upper wall, so the room has light without a fixture hanging in the middle of it. In a walk-in with no ceiling fitting, that wash is the difference between a cupboard you duck into and a room you stand in.
Why indirect and not a downlight: a visible source in a small room becomes the thing you look at, and it puts the brightest point of the room on the floor rather than on the clothes. The cove puts the light on the ceiling plane and lets it fall. It also forgives the run - a cove reads the same whether the wardrobe is 2.4 m or 4.8 m long, because you are lighting a surface, not filling a volume.
The cove layer goes on a dimmer. That is not a luxury: the same room is used at 7 a.m. with the curtains shut and at 11 p.m. looking for a jumper, and a single brightness cannot serve both. We spec dimmable drivers on this layer and a fixed output on the task layers, because a dimmed task light is just a dim task.
Layer two: integrated strips in the uprights
The second layer is the one that does the work. An LED strip sits in a channel milled into the upright, so the light runs down the panel face and lands on the hanging bay beside it. You see a lit panel; you do not see a light fitting. In the showroom system photographed below, the strips are set into the uprights either side of each hanging bay, and the ceiling cove runs above them - two sources, neither of them visible.
This is where colour temperature earns its keep. We spec 3000K in the garment bays and 4000K only at the vanity or care station: fabric reads truer under warm light, and a mirror needs neutral light to be useful. Warm light in a wardrobe is not a mood choice - a navy jacket and a black jacket are the same jacket under cold light, and the buyer who discovers that at the office door blames the wardrobe.
Everything in this layer is specified at destination voltage - 120 V or 230 V, the same decision the wardrobe pages publish - and fed from a driver sized to the run, not from an adaptor tucked behind a shelf. The channels are part of the upright extrusion, so there is no adhesive strip peeling off a panel in eighteen months and no cable visible in the gap between bays.
Layer three: light inside the fitting
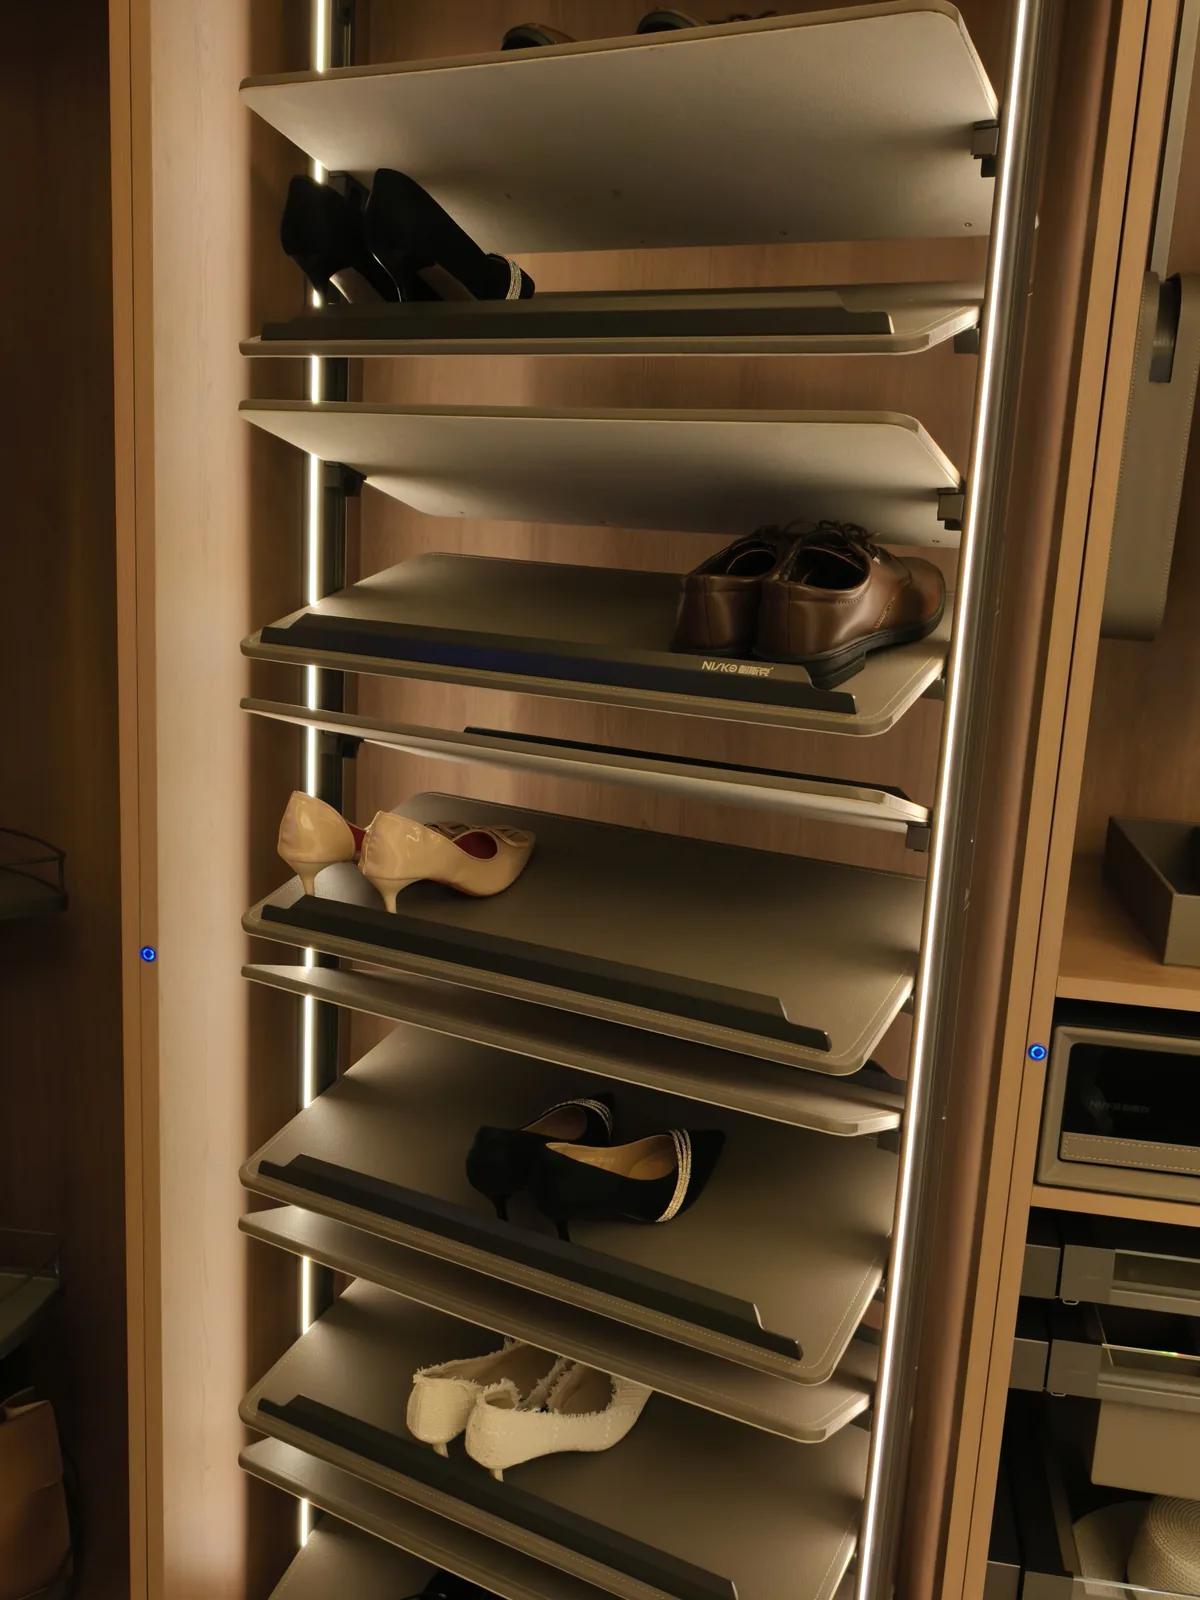
The third layer is small and it is the one clients talk about afterwards. Strips flank the inside of a fitting, so the shelf you reach into is lit at the moment you reach into it. The rotating shoe tower below carries its light on the uprights: each tilted shelf is lit as it swings past, and the stack turns in light rather than throwing a shadow on itself.
The same treatment goes into the jewellery drawer, the watch-care station and any bay where the contents are small and dark - a drawer of cufflinks is unsearchable under cove light alone. This layer is not about atmosphere; it is about being able to see the back row.
Does the light inside a rotating shoe tower stay on when it turns? Yes - the strips are mounted on the uprights, not on the rotating stack, so the light stays put while the shelves swing past it. That sounds obvious until you see a tower with the strip taped to the rotating frame, which is exactly the shortcut we do not take.
Sensors, switches and the driver question
Control is where a lighting scheme either disappears or annoys. Open walk-ins get a motion sensor with a short time-out; door-fronted wardrobes get a door-contact switch - both wired to the same lighting circuit. The rule we follow: if the room has doors, the door decides; if it does not, movement decides, and the time-out is short enough that nobody stands in the dark waiting for it.
The driver question gets asked on every project, because a buried driver is the failure that takes a wardrobe apart. Every driver sits in a serviceable bay behind an access panel, marked on the drawing - never buried inside a carcass, so a failure is a panel off, not a wardrobe apart. If you are comparing quotations, ask where the drivers live; the answer should be a marked panel, not a hope.
And the supply question, stated plainly. The channels, cable routes and driver positions are built into the wardrobe order, and the LED hardware can ship with the run or be bought locally - most clients buy locally because it is a warranty item in most markets. The final connection to the room circuit is the site electrician's, and we leave a labelled tail at each driver position. A factory that claims the whole electrical scope is guessing at your site; a factory that leaves you with unmarked tails is guessing at ours.
The specs behind the closet lighting
| Layer | What it lights | Where the source sits | Control |
|---|---|---|---|
| Cove wash | ceiling and upper wall | behind a valance at the top of the run | dimmer |
| Upright strips | the panel face and the hanging bay | channel milled into the upright | door switch or sensor |
| Fitting task light | the shelf you reach into | channel in the fitting uprights | same circuit as the layer above |
The carcass the lighting is built into is the specification we publish on the wardrobe pages, so a quote can be compared against any other factory's:
- 18mm E0-grade plywood carcass (ENF on request), 2mm PVB hot-melt edge banding on every cut edge.
- 32mm system hole pattern - 32mm pitch, 5mm bores, 37mm setback - so the uprights that carry the light channels re-position like any other panel.
- Blum soft-close hardware tested to 50,000 cycles on every door and drawer in the run.
- Full-extension runners rated 35-45 kg per pair.
- Standard wardrobe depth 24 inch, with 14 inch as the option for shallow runs.
Retrofit is the honest edge of this topic, and buyers ask it weekly. For furniture already installed the honest options are a surface-mounted profile with a visible driver, or leaving it alone - we will draw either, but we do not sell a retrofit as if it were the built-in version. On a run we are building, closet lighting costs a drawing note: the channels are milled on the same bench pass as the shelf pinning, and the layout leaves the site electrician nothing to guess.
What we quote and how long it takes
We do not publish lighting prices, for the same reason we do not publish carcass prices: the layout is drawn to your room, so the number only exists against your drawing. Quotes are issued per linear foot, duty-paid, against the final drawing, with the lighting layers itemised as fittings rather than as a separate electrical contract.
A wardrobe order runs 12-16 working days from drawing sign-off, lighting included. The channels, the drivers and the sensors are kitted with the run, not ordered after it - which is the whole point of specifying closet lighting at drawing stage rather than at handover.
Where the photos came from
Every showroom photograph on this page was taken in our partner's showroom - not rendered, and not shot on a customer site. The two systems here are the same upright-and-cove approach photographed two ways: one wide, one inside the fitting. Renderings, where we use them elsewhere on the site, are labelled as renderings. If you want photographs from installed projects instead, ask and we will send what we have from the relevant market.
FAQ
What colour temperature is best for closet lighting?
We spec 3000K in the garment bays and 4000K only at the vanity or care station: fabric reads truer under warm light, and a mirror needs neutral light to be useful.
Can you add lighting to a wardrobe that is already built?
For furniture already installed the honest options are a surface-mounted profile with a visible driver, or leaving it alone - we will draw either, but we do not sell a retrofit as if it were the built-in version.
Where does the LED driver go, and can it be serviced?
Every driver sits in a serviceable bay behind an access panel, marked on the drawing - never buried inside a carcass, so a failure is a panel off, not a wardrobe apart.
Motion sensor or door switch for a wardrobe?
Open walk-ins get a motion sensor with a short time-out; door-fronted wardrobes get a door-contact switch - both wired to the same lighting circuit.
Who supplies the lighting hardware, and who connects it?
The channels, cable routes and driver positions are built into the wardrobe order, and the LED hardware can ship with the run or be bought locally - most clients buy locally because it is a warranty item in most markets. The final connection to the room circuit is the site electrician's, and we leave a labelled tail at each driver position.
Does the light inside a rotating shoe tower stay on when it turns?
Yes - the strips are mounted on the uprights, not on the rotating stack, so the light stays put while the shelves swing past it.


